

June 23, 2011
Lytro: Invents A Camera That Cares Less About Focus

Lytro, a Silicon Valley startup, has produced a camera that lets you focus a picture after you take it--over and over again. The camera relies on innovative new technologies that use light fields to create photographs that are manipulable post-shot.
A light field is all the light traveling in every direction in through every part of space present in a scene. Using a light field sensor, the Lytro camera can capture the color, intensity and direction of the light in a photo. That means that users can refocus, and relight a picture after its been taken, using the light information gathered, changing the focal point of the image from foreground to background, and more.
Imagine a photo where you've accidentally blurred out the people and instead highlighted a row of flowers behind their heads. With Lytro, you can fix your mistake days later, with the click of a button. Lytro calls the new pictures "living photos," and uses Flash software to let users click around and adjust the picture to their satisfaction.
The photos can also be viewed in 3D, and unlike conventional cameras, will be much speedier, since users won't have to wait for the autofocus to work before snapping the shot. Founder Ren Ng told The New York Times that he could see people using the site to see pictures in different perspectives on a site like Facebook, for which they are developing an app.
Though Lytro hasn't yet released any price on the phone, or the date when it will be available, it's made for consumers rather than professionals. Ng told TechCrunch it would be available "sometime this year" and that it would cost more than a dollar and less than $10,000.
Ben Horowitz, of the venture capital firm Andreessen Horowitz, one of Lytro's investors, wrote rapturously of the device.
Essentially, you can take the picture you wish you would have taken after the fact. If you are used to the old paradigm, it’s like travelling backwards through time. You can take a picture then figure out what you really wanted then go back through time and take that picture.
Check it out in this photo below by Richard Koci Hernandez. Click around to see Elvis come into focus in the foreground:
June 16, 2011
India's $35 tablet expected to launch this month

It's been a while since we've heard any major news about India's ambitious $35 tablet, but a new report suggests that it's finally inching toward reality. According to the Times of India, the controversial project is approaching the finish line with 100,000 units expected to ship this summer, starting this month. The government is expected to deliver 10,000 tablets to IIT Rajasthan in late June, while another 90,000 units will be rolled out over the next four months.
The launch price is reportedly set at 2,200 rupees, which is approximately equivalent to $49. Although that's higher than the initial $35 target, the government reportedly plans to cut the price in half with subsidies. Assuming that information is accurate, students might be able to purchase the tablet for less than we originally thought. Regardless, it's not such a bad deal at $49, especially considering most of us doubted the device would even see the light of day.
Named "Sakshat," the slate was first announced last summer and was delayed this January following complications with its primary hardware vendor, HCL Infosystems. Designed for academic use, Sakshat features a 7-inch touchscreen, support for video conferencing, 32GB of storage, 2GB of RAM, a USB port, Wi-Fi connectivity, and enough horsepower to play YouTube videos. To keep costs in check, the device utilizes Linux and other open source software.
June 9, 2011
10 Useful Andriod Hacks and Tips

It sounds like a complex procedure but, for virtually all Android handsets, it’s surprisingly easy, but instructions for major handsets – such as the HTC Desire, Samsung Galaxy S and Sony Ericsson Xperia X10 are easy enough to find, although you’ll be taking your phone and, perhaps, your warranty, into your own hands if you proceed.
Still, that’s not to say that you need a rooted handset to take advantages of some of these tweaks – here are ten of our favourite Android hacks and tricks, rooted or not:
1) Replace your car’s satnav system
This will only work if you’ve got a phone that can connect over a TV-out cable – that’ll restrict you to a mere handful of handsets, including the Samsung Galaxy S, HTC EVO 4G and Droid Incredible, which is used in this video – and a car that’ll display the signal on its screen.
If you tick those boxes, though, you could be in for a money-saving treat. Why invest in a satnav, after all, when you could use Google’s own software? It’s got undoubted pedigree.
Satnav’s only the tip of the iceberg. Connect your phone to access your music collection, read your Twitter feed, check the latest headlines or perform any other function on your dashboard. While Android in cars has been mooted before, no concrete models have appeared, so this is the next best thing.
2) Run Android on your old iPhone

If you’ve still got an iPhone 2G or 3G gathering dust, it can be hard to know what to do with it – after all, you’ve likely replaced that older model with a snazzy new iPhone 4. If you’d like to experience the unrestricted pastures of Android, though – and perhaps try out apps that Steve Jobs has deemed unacceptable, such as the Wikileaks cables – then follow these steps, which begin with jailbreaking your phone.
You’re not restricted to installing Android on an old iPhone, either. Intrepid developers have busily ensured that a whole range of devices can be hacked to run Google’s OS: from the Windows Mobile-running HTC HD2 to an old netbook.
3) Overclock your handset
You’ll need to have rooted before trying this trick, but it’s worth it if your phone struggles when multi-tasking or running intensive applications.
Of course, as with a desktop PC, overclocking a phone comes with risks. The processor inside your handset’s been designed to run at a specific speed and, without any active cooling inside its chassis, running the chip at a faster pace will generate additional heat and use more power.
The versatility of these apps does mean that it’s possible to combat these symptoms by underclocking your phone’s processor, saving battery power and potentially prolonging the chip’s life in the process.
4) Play classic games
One potentially dubious benefit of Android’s open approach is that its market is full of software emulators for classic games consoles: a quick scan on AppBrain reveals software like SNesoid, GameBoid and Ataroid – apps that wear their retro allegiances firmly on their sleeves.

Install Ubuntu
Why settle for just only open-source OS on your device? We suspect that this particular trick won’t work if you own older and less powerful Android devices such as the HTC Hero, but owners of newer, faster handsets might want to take a gander at this guide.
It’s an impressive trick – just imagine pulling out your Nexus One at a (very, very geeky) party and booting into Ubuntu. As neat as it is, we’re struggling to think of practical uses for this trickery. After all, Ubuntu isn’t designed for touch interfaces and small smartphone screens could be problematic, too.
6) Change your look

Android is the most versatile mobile OS around. Don’t believe us? Take a look at the sheer number of apps, themes and graphics that are available for customising your phone. Numerous apps are designed to replace Android’s stock front-end or manufacturer-provided software, with tools such as LauncherPro, Home++ and HelixLauncher just three of many in the Market.
That’s just the start. Basic modifications like wallpaper changes can be livened up with animated backgrounds, and new icons can be downloaded if you don’t like the standard ones included with your home screen replacement. Tools such as Beautiful Widgets have their own communities churning out hundreds of stylish skins for its software.
It’s also worth taking a gander at some of the home screens posted on Reddit’s Android forum: with examples such as this, this and this regularly making the rounds, it’s no surprise that Google’s OS is doing so well for itself.


7) Install root-only apps
Rooting your phone opens it up to a whole new world of options, not least the chance to install apps that aren’t available in the regular Market. Plenty of these allow extra control over the behind-the-scenes operations of your phone: some provide quick booting options, others allow your system to access extra memory, and more permit developers to access and edit the SQL databases used by most standard apps.
Plenty of root apps prove themselves useful in other ways. Screenshot tools will prove invaluable if you’re used to the faff of getting screenshots from a stock Android phone, which involves installing the Android SDK and jumping through several dozen hoops. Backup tools, Wi-Fi tethering and battery-management and conservation utilities are all commonplace, too. Root apps tend to be on the geeky end of the spectrum, but they’re very useful.
8) Control your media centre

Having a smartphone means that your media collection needn’t be limited to your PC. Install an app like Gmote alongside its PC server software and you’ll see what we mean: by using Wi-Fi streaming it’ll grant access to your entire media collection.
Its slick interface makes navigating your media collection a doddle and a couple of options mean that you can choose to play files on your PC or on your phone. It’s also possible to switch to a touchpad-style interface that allows you to take control of your PC from your touchscreen.
9) Open your garage door
Yes, seriously. It’s the work of one imaginative Android owner, and it’s brilliant.
10) Get the latest Android versions, fast
Every Android user is familiar with the seemingly endless waiting that punctuates every OS update: while Google might announce that the latest version is available, handset owners still have to twiddle their thumbs while their manufacturer and phone network tweak the software and add plenty of crapware before releasing it to paying customers.
If you’ve rooted your phone, though, then you don’t have to go through any of that hassle; instead, merely wait for an eager developer to release a ROM of the latest Android build and you’re good to go. It certainly beats waiting months for HTC to release the 2.1 update for the Hero.
And if you have any tips or hacks to share with us please do with the comment box below.
June 6, 2011
Acer Iconia Tab W500 Windows 7 Tablet Review
Despite the popularity of Apple’s iPad and the booming market for Android tablets, there are still plenty of Windows 7 tablets out there. The latest is Acer’s W500 hybrid tablet, a 10.1 inch tablet based on a 1GHz AMD C-50 processor, 2GB of DDR3 ram and a 32Gb SSD. It also comes (optionally) with a keyboard dock that allows you to turn it into a netbook.

Both iOS and Android are polished tablet operating systems, though there is still demand for Windows on tablets. This might be because people want the power of Windows, they want to use their existing Windows software or perhaps because they’re getting ready to move to the next version of Windows next year.
Categories:
Hardware,
Reviews,
Windows,
Windows 7 Tablets
November 13, 2010
Step by Step Guide on Connecting to a Wi-Fi Network Using Windows
Wireless Internet (Wi-Fi) zones are convenient, easy to access, and available to any device with a wireless adapter. Finding open wireless Internet is usually no problem in populated areas. In fact, airports, libraries, and cafés often advertise free Wi-Fi hotspots.
When you find an open Wi-Fi zone, you'll need to take a few simple steps in Windows 7 or Windows Vista to connect safely. Note that public Wi-Fi networks are typically unsecured, meaning that a determined attacker can follow everything you do while siphoning off your private information. While we recommend avoiding unsecured networks whenever possible, sometimes you just need to use one. Whether your network is secured or unsecured, follow these steps to connect:
When you find an open Wi-Fi zone, you'll need to take a few simple steps in Windows 7 or Windows Vista to connect safely. Note that public Wi-Fi networks are typically unsecured, meaning that a determined attacker can follow everything you do while siphoning off your private information. While we recommend avoiding unsecured networks whenever possible, sometimes you just need to use one. Whether your network is secured or unsecured, follow these steps to connect:
Step by Step: In Windows 7
1. Click the network icon in the notification area to open the list of available networks. Alternatively, click the Windows Start button and open Control Panel; click Network and Internet; and then click Connect to a network (under Network and Sharing Center) to open the list of available networks.

2. Click the network to which you would like to connect.
3. Click the Connect button. If the network is security-enabled, you'll need to enter a security key obtained from the network administrator.
If this is the first time you are connecting to the network, you'll be prompted to choose a network location. A network location is a profile Windows uses to determine appropriate security settings. Always choose the Public network location when connecting to public Wi-Fi networks. You can change the location of any network you connect to by clicking Start, Control Panel, Network and Internet, Network and Sharing Center. Change the network location by clicking the network location below the network name.
Step by Step: In Windows Vista
1. Click the Windows Start button, then click Connect to. Alternatively, click Start, Control Panel, Network and Internet, Connect to a network (under Network and Sharing Center).

2. In the list of available networks, click the network to which you would like to connect.
3. Click the Connect button. If the network is security-enabled, you'll need to enter a security key (obtained from the network administrator).
Remember: Unsecured wireless networks--which many public Wi-Fi hotspots are--carry greater risk than secured (password-protected) wireless networks. Do not work with sensitive information while surfing on an open public network.
Categories:
computer tricks,
Hardware,
Networking,
Wireless
Setting Up VPN in Windows 7 for Dummies
VPN (Virtual Private Network) technology lets a computer using a public Internet connection join a private network by way of a secure "tunnel" between that machine and the network. The most common case is a business allowing its employees to connect to its work network from home or from the road.
There are two principal ways to configure VPN. The first and more-common scenario, called outgoing, is setting up a remote computer to call into the office network. The second scenario, called incoming, occurs on the network side, where a computer allows secure connections from other computers. Windows 7 comes preloaded with the Agile VPN client, which makes setting up either kind of connection relatively easy.
Step by Step: Connecting to a VPN (Outgoing)
Step 1 Click the Start button. In the search bar, type VPN and then select Set up a virtual private network (VPN) connection.
Step 2 Enter the IP address or domain name of the server to which you want to connect. If you're connecting to a work network, your IT administrator can provide the best address.
Step 3 If you want to set up the connection, but not connnect, select Don't connect now; otherwise, leave it blank and click Next.
Step 4 On this next screen, you can either put in your username and password, or leave it blank. You'll be prompted for it again on the actual connection. Click Connect.
Step 5 To connect, click on the Windows network logo on the lower-right part of your screen; then select Connect under VPN Connection.
Step 6 In the Connect VPN Connection box, enter the appropriate domain and your log-in credentials; then click Connect.
There are two principal ways to configure VPN. The first and more-common scenario, called outgoing, is setting up a remote computer to call into the office network. The second scenario, called incoming, occurs on the network side, where a computer allows secure connections from other computers. Windows 7 comes preloaded with the Agile VPN client, which makes setting up either kind of connection relatively easy.
Step by Step: Connecting to a VPN (Outgoing)
Step 1 Click the Start button. In the search bar, type VPN and then select Set up a virtual private network (VPN) connection.
Step 2 Enter the IP address or domain name of the server to which you want to connect. If you're connecting to a work network, your IT administrator can provide the best address.
Step 3 If you want to set up the connection, but not connnect, select Don't connect now; otherwise, leave it blank and click Next.
Step 4 On this next screen, you can either put in your username and password, or leave it blank. You'll be prompted for it again on the actual connection. Click Connect.
Step 5 To connect, click on the Windows network logo on the lower-right part of your screen; then select Connect under VPN Connection.
Step 6 In the Connect VPN Connection box, enter the appropriate domain and your log-in credentials; then click Connect.
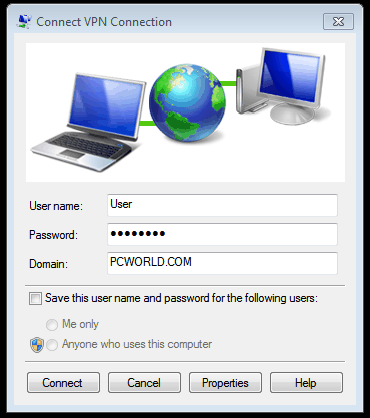
Step 7 If you can't connect, the problem could be due to the server configuration. (There are different types of VPN.) Check with your network administrator to see what kind is in use--such as PPTP--then, on the Connect VPN Connection screen, select Properties.
Step 8 Navigate to the Security tab and select the specific Type of VPN from the drop-down list. You may also have to unselect Include Windows logon domain under the Options tab. Then click OK and Connect.
Step 8 Navigate to the Security tab and select the specific Type of VPN from the drop-down list. You may also have to unselect Include Windows logon domain under the Options tab. Then click OK and Connect.
Step by Step: Building a VPN (Incoming)
Step 1 Click the Start button, and, in the search bar, type Network and Sharing.
Step 2 Click Change Adapter Settings in the left-hand menu.
Step 3 Click File, and then New Incoming Connection.
Step 4 Select the users you'd like to give access to and click Next.
Step 5 Click Through the Internet and select Next.
Step 6 Select the Internet Protocol you'd like to use. (The default TCP/IPv4--the line highlighted in the screenshot below--will work fine.)

Step 7 Finally, click Allow access; you've now set up an incoming VPN connection.
Categories:
Hardware,
Networking,
Wireless
Subscribe to:
Posts (Atom)