

September 6, 2011
How to measure wireless router performance
Are you getting all that you can from your wireless router? How do you know? If you're not getting the same range or throughput as you used to, something may be awry. Here's how to measure your wireless router's performance to make sure that it's running at its best:
Signal strength
To measure signal strength and to identify the active wireless channels around you, we recommend using a program called inSSIDer.
When you launch inSSIDer, you'll notice a list of wireless networks around you, including your own. Each network's signal strength is displayed in the RSSI column. The signal strength is updated in near real-time, so you can actually move around with your laptop to observe fluctuations in signal strength.

Throughput
To measure throughput, download and install a program called QCheck, by Ixia. It's a free download, but you'll have to register to get the download link e-mailed to you.
Install QCheck on two computers--one that's plugged into your router via Ethernet and one on a wireless computer. Each computer with QCheck installed is considered an endpoint. Alternatively, you can install QCheck on just the computer you'll be running the QCheck console on, then install Ixia's Performance Endpoint software on the partner computer.
After starting QCheck, enter the IP address of Endpoint1 (the PC running the QCheck console) and Endpoint2 (the partner PC). Select "Throughput" in the Options section and click the Run button to get your throughput results.

That's it. Your wireless router's signal strength and network throughput measurements will help you confirm whether or not your wireless network is performing as expected. If not, these tools should also help you narrow down the cause.
Categories:
Networking,
Router,
Wi-Fi,
Wireless
November 13, 2010
Step by Step Guide on Connecting to a Wi-Fi Network Using Windows
Wireless Internet (Wi-Fi) zones are convenient, easy to access, and available to any device with a wireless adapter. Finding open wireless Internet is usually no problem in populated areas. In fact, airports, libraries, and cafés often advertise free Wi-Fi hotspots.
When you find an open Wi-Fi zone, you'll need to take a few simple steps in Windows 7 or Windows Vista to connect safely. Note that public Wi-Fi networks are typically unsecured, meaning that a determined attacker can follow everything you do while siphoning off your private information. While we recommend avoiding unsecured networks whenever possible, sometimes you just need to use one. Whether your network is secured or unsecured, follow these steps to connect:
When you find an open Wi-Fi zone, you'll need to take a few simple steps in Windows 7 or Windows Vista to connect safely. Note that public Wi-Fi networks are typically unsecured, meaning that a determined attacker can follow everything you do while siphoning off your private information. While we recommend avoiding unsecured networks whenever possible, sometimes you just need to use one. Whether your network is secured or unsecured, follow these steps to connect:
Step by Step: In Windows 7
1. Click the network icon in the notification area to open the list of available networks. Alternatively, click the Windows Start button and open Control Panel; click Network and Internet; and then click Connect to a network (under Network and Sharing Center) to open the list of available networks.

2. Click the network to which you would like to connect.
3. Click the Connect button. If the network is security-enabled, you'll need to enter a security key obtained from the network administrator.
If this is the first time you are connecting to the network, you'll be prompted to choose a network location. A network location is a profile Windows uses to determine appropriate security settings. Always choose the Public network location when connecting to public Wi-Fi networks. You can change the location of any network you connect to by clicking Start, Control Panel, Network and Internet, Network and Sharing Center. Change the network location by clicking the network location below the network name.
Step by Step: In Windows Vista
1. Click the Windows Start button, then click Connect to. Alternatively, click Start, Control Panel, Network and Internet, Connect to a network (under Network and Sharing Center).

2. In the list of available networks, click the network to which you would like to connect.
3. Click the Connect button. If the network is security-enabled, you'll need to enter a security key (obtained from the network administrator).
Remember: Unsecured wireless networks--which many public Wi-Fi hotspots are--carry greater risk than secured (password-protected) wireless networks. Do not work with sensitive information while surfing on an open public network.
Categories:
computer tricks,
Hardware,
Networking,
Wireless
Setting Up VPN in Windows 7 for Dummies
VPN (Virtual Private Network) technology lets a computer using a public Internet connection join a private network by way of a secure "tunnel" between that machine and the network. The most common case is a business allowing its employees to connect to its work network from home or from the road.
There are two principal ways to configure VPN. The first and more-common scenario, called outgoing, is setting up a remote computer to call into the office network. The second scenario, called incoming, occurs on the network side, where a computer allows secure connections from other computers. Windows 7 comes preloaded with the Agile VPN client, which makes setting up either kind of connection relatively easy.
Step by Step: Connecting to a VPN (Outgoing)
Step 1 Click the Start button. In the search bar, type VPN and then select Set up a virtual private network (VPN) connection.
Step 2 Enter the IP address or domain name of the server to which you want to connect. If you're connecting to a work network, your IT administrator can provide the best address.
Step 3 If you want to set up the connection, but not connnect, select Don't connect now; otherwise, leave it blank and click Next.
Step 4 On this next screen, you can either put in your username and password, or leave it blank. You'll be prompted for it again on the actual connection. Click Connect.
Step 5 To connect, click on the Windows network logo on the lower-right part of your screen; then select Connect under VPN Connection.
Step 6 In the Connect VPN Connection box, enter the appropriate domain and your log-in credentials; then click Connect.
There are two principal ways to configure VPN. The first and more-common scenario, called outgoing, is setting up a remote computer to call into the office network. The second scenario, called incoming, occurs on the network side, where a computer allows secure connections from other computers. Windows 7 comes preloaded with the Agile VPN client, which makes setting up either kind of connection relatively easy.
Step by Step: Connecting to a VPN (Outgoing)
Step 1 Click the Start button. In the search bar, type VPN and then select Set up a virtual private network (VPN) connection.
Step 2 Enter the IP address or domain name of the server to which you want to connect. If you're connecting to a work network, your IT administrator can provide the best address.
Step 3 If you want to set up the connection, but not connnect, select Don't connect now; otherwise, leave it blank and click Next.
Step 4 On this next screen, you can either put in your username and password, or leave it blank. You'll be prompted for it again on the actual connection. Click Connect.
Step 5 To connect, click on the Windows network logo on the lower-right part of your screen; then select Connect under VPN Connection.
Step 6 In the Connect VPN Connection box, enter the appropriate domain and your log-in credentials; then click Connect.
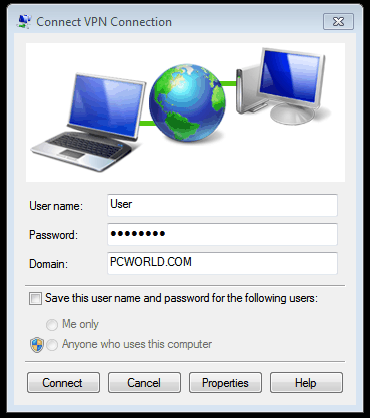
Step 7 If you can't connect, the problem could be due to the server configuration. (There are different types of VPN.) Check with your network administrator to see what kind is in use--such as PPTP--then, on the Connect VPN Connection screen, select Properties.
Step 8 Navigate to the Security tab and select the specific Type of VPN from the drop-down list. You may also have to unselect Include Windows logon domain under the Options tab. Then click OK and Connect.
Step 8 Navigate to the Security tab and select the specific Type of VPN from the drop-down list. You may also have to unselect Include Windows logon domain under the Options tab. Then click OK and Connect.
Step by Step: Building a VPN (Incoming)
Step 1 Click the Start button, and, in the search bar, type Network and Sharing.
Step 2 Click Change Adapter Settings in the left-hand menu.
Step 3 Click File, and then New Incoming Connection.
Step 4 Select the users you'd like to give access to and click Next.
Step 5 Click Through the Internet and select Next.
Step 6 Select the Internet Protocol you'd like to use. (The default TCP/IPv4--the line highlighted in the screenshot below--will work fine.)

Step 7 Finally, click Allow access; you've now set up an incoming VPN connection.
Categories:
Hardware,
Networking,
Wireless
Subscribe to:
Posts (Atom)